How to stop on Inline
Skates
Using a Heel brake
March 2002
Learning to stop with a
heel brake is relatively easy when you're shown how to do it
properly, and most people should be able to stop confidently
within a couple of weeks with sufficient practice.
Unfortunately if there's no-one to show you how, learning this
simple stop can be quite difficult as the technique isn't
intuitive. It's all about technique and not about strength.
You'll find that being
able to stop quickly and confidently will do wonders for your
enjoyment of skating. Not being able to stop when you urgently
need to can be one of the more terrifying experiences for a
skater. If you're a new skater don't listen to foolish skaters
who will tell you that you don't need the heel brake. Sure, you
don't need the heel brake to be able to stop, but it's by far
the easiest and most powerful way to stop on inline skates.
Before you start.
If you're wanting to
learn how to stop, it's probably quite likely that you're a
newer skater, so I'd advise you to get proper instruction from a
certified instructor. Learning with an instructor tends to make
learning much easier, and will help to boost your confidence
more quickly.
Next, be sure to wear
all the recommended protective gear. Falling on tarmac hurts!
You should be wearing an approved helmet, knee pads, elbow pads,
and wrist guards. Find a smooth flat and quiet area on which to
practice. This will make it easier to learn in peace. The heel
brake should be done in a straight line, so a good tip is to
find a line marking on the road surface and do each of the steps
while gliding along next to this line.
Step 1 - Ready
position
This is a basic
position, and is used as the starting point for many other
skating manoeuvres. Skate along at a comfortable, but not slow,
speed, and then:
- Keep your skates shoulder width (or
slightly less) apart and parallel to each other.
- Bend your knees so that they are
vertically above your toes - you shouldn't be able see your
toes as they should be covered by your knee pads. At first
you may find that this much bend is enough to cause your
thighs to burn quickly. Persist - your thighs will get
stronger, and just remember that the more bent your knees
are the less distance you have to fall. Anyway, bent knees
will significantly increase your stability, and thus make
you less likely to fall.
- Keep an equal amount of weight on both
legs.
- Hold your arms out in front of you.
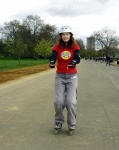 |
Step 1 - the ready
position from the front. Note how Asha's feet are
shoulder width, or slightly less, apart. Her skates are
also vertical - i.e. not leaning in or out. |
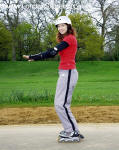 |
Step 1 - the ready
position from the side. Note the knee bend - keep your
knees over your toes, and your back straight and
upright. |
Step 2 - Scissor
Another basic
position. It's important to master these techniques if you
haven't already, as they are the start of many of the more
advanced moves and tricks that you'll learn later.
You need to scissor
your braking leg in order to get it further in front. Remember
that when you actually start braking, your weight is going to
transfer forwards, so scissoring will stop you falling on your
face.
- Push your brake skate forward and the
other skate a little back. This would usually be your right
skate, but some skates have a heel brake on both sides, or
on the left as some people prefer to brake with their left
foot.
- Your front skate should be only slightly
in front of your rear skate - the brake pad should be just
in front of the front wheel of your rear skate.
- Keep most of your weight on the rear
leg. When you're practicing you can check this by trying to
tap the toe wheel of your front skate on the ground. If you
can't tap it easily you've probably got too much weight on
the front leg.
- Don't lift the toe at this stage. It's
more important to get the scissor stable and under control.
- Slightly narrow the distance between your
skates, to perhaps the width of one fist between your
skates.
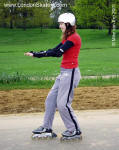 |
Step 2 - Scissor.
|
Step 3 - Slide
- Prepare to brake by lifting the toe of
your front skate, but you're not actually going to brake
just yet.
- The aim is to get the brake brushing the
ground, but softly enough that only a little braking
friction is generated.
- Be sure to keep your feet pointed
straight ahead, your knees bent, and your back straight.
Don't use your toes to
lift the toe of your skate. It's hard to bend your skate at the
cuff, and you'll find it much easier to drop your hips slightly
and push your foot down and forwards to bring the brake down
onto the road surface. That way you'll be keeping the skate
boot and cuff at the same angle relative to each other, and not
using your relatively weak shin muscles to lift the skate toe.
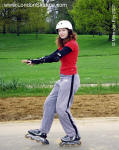 |
Step 3 - Lift the toe |
Step 4 - Sit
- Sit down gently by further bending your
rear leg. I once heard an American instructor describe this
motion by telling a student to pretend he/she was about to
sit on an imaginary toilet. Pretty funny, but also a very
apt way to describe this.
- Do this gently and slowly the first few
times else you may be surprised at how powerfully your brake
engages!
- The effect of sitting down will be to
smoothly engage your heel brake, which will quickly slow you
down.
- Ease on the sitting down motion until
you're stopping quickly, and then maintain that position
until you've come to a complete halt. Only then step out of
the braking position and you'll have made a successful heel
brake stop.
- Remember that your brake needs to have
quite a lot of force applied to it to generate enough
friction to stop you. That's why these four steps are used
to ensure that you easily generate enough stopping power
with your weight, and that it all happens under control
using correct technique.
- Think of squashing a bug under your
healbrake.
- Be sure you keep your front foot in the
same position relative to your rear foot and body. Don't
let it slip backwards under the braking pressure, but
equally don't let it go forwards.
- Be sure to keep your feet pointing in the
same direction.
- You should do the entire stop in a
straight line. Once you're good at the stop, you'll find it
possible and easy to stop while turning or on rough
surfaces, but leave those for now.
- Remember that your body should stay
mostly upright. You're going to have to lean slightly to
perform this step, but your back should be as straight and
as upright as possible.
This step is the only one that will actually
stop you - all the previous steps are preparatory moves.
 |
Step 4 - Brake. This
is done by sitting down and thus putting pressure into
the heal brake. |
Putting it all together
- Be sure to start out doing each step
slowly, carefully, and CORRECTLY. This is the only way to
ensure that your muscles and nerves learn the correct
movements properly. Unlearning the wrong movements takes
much longer than making sure you have them right in the
first place. Speed and stopping power will come as you gain
confidence and familiarity.
- Mentally think of Step 1: ready position,
Step 2: scissor, Step 3: engage brake, and Step 4: sit down
each time you go through the stopping process. After you've
done a lot of stops over a few weeks you should find that
the whole process comes much more naturally.
- Practice the stop every time you go out
skating.
|
|
|
|
|
| Step 1: Ready position |
Step 2: Scissor |
Step 3: Slide |
Step 4: Sit down |
Once you have the stop down pat, try the
following more advanced steps:
- Smooth out the transitions between each
step, and do them a little more quickly. Don't skip any
though, else it's likely to go wrong.
- Increasing the braking force by sitting
down more quickly on step 4, and eventually by shoving your
front foot down and forwards into the ground. Remember it's
much more effective and easier to use your weight to push
the brake into the ground rather than your calf and thigh
muscles.
- Together with this, make a chalk mark on
your practice surface and try to stop before that mark.
You'll soon find yourself able to skate faster and faster,
and still be able to stop before the mark.
- Try out stopping on some rougher
surfaces, such as rough tarmac, paving slabs, tiles, etc.
Be careful about your brake juddering or catching, but
you'll be amazed at how easy it is to stop on these
non-ideal surfaces.
- See if you can make that brake pad
screech and even smoke!
|
